top of page
COMPUTER APPLICATION
Project 1A &1B
DRA HOUSE IN BALI BY D-ASSOCIATES
Project 1

1. Setting out grid lines and extruding walls

2. Creating more grid lines and extruding interior walls or partitions

3. Create columns on ground floor plan
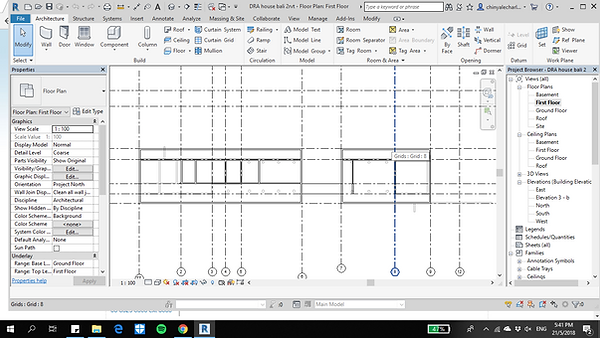
4. Extrude walls on First Floor Plan

5. Extrude exterior and interior walls on basement plan
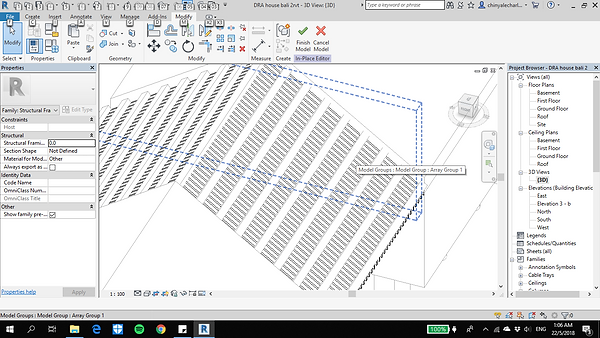
6. Create Model-in Place Roof Truss and using array tool to duplicate structure

7. Setup 3D view and create link bridge with model in place.

8. Roof structure is hidden in view to create roof truss, before adding roofing above roof truss

9. Editing material of floor and create special material for flooring or decking

10. Editing material for wall structure and creating special wall finishes, for example, timber finish.

11. Creating model in place pool, for the landscape around building

11. Creating railings along corridors using railing tool.
Project 2
Project 2
EXTERIOR AND INTERIOR RENDERINGS
DRA HOUSE IN BALI BY D-ASSOCIATES


1. FBX File is exported from Revit (Project 1A & 1B)
1.1 FBX File is selected then imported into 3Ds Max 2018. NVIDIA Mental Ray 2018 Plugin is also downloaded for this project.


3. Using Material Editor- Compact Material Editor to customise the material for each surface, this is the main tab to insert materials
2. Plane is added to create a surface before adding any material


4. In order to have a desired material that suits the building, here I used bitmap to create custom made material that allow it to be attached onto the building
5. Standard material is used by adding Bitmap to insert seamless texture that is found online, to be inserted to the building. This offers wide range of adjustment like bump, diffuse, reflectivity for the desired material.


6. Once inserted image to the diffuse and bump tab, the material does not seem proportionate, that is why UVW Mapping is used. UVW Map allows the material to adjust according to real life size.
7. Mental Ray Renderer is changed before adding any daylighting system. Mental Ray is a plugin that provides more accurate daylighting and materials variation.


8. Under systems, then daylighting, mental ray Sun is equipped with direction of sun and a more realistic sun. Position of the sun is moved using manual, instead of using desired location, time.
9. After applying daylighting, environment background is changed. This is to customise the background and environment behind. Image is attached in compact material editor then transferred to the environment and effects tab.


10. To edit details of materials at certain spaces, Edit Poly tool is used to create a more accurate measurements and appearance for the material
11. Other than the standard materials, Autodesk Materials are also used, these are templates that can be used to apply materials,


12. Light is inserted into the interior and exterior space, using either Mental Ray Sky Portal or Target Light.
13. Settings changed from Standard to High Quality for more detailed and define lighting, renderings for view.


14. Once amendments are done and satisfied with the materials, Camera tool is inserted and angled to the direction and angle that portrays the best view
15. With the camera view, it can be prepared to render for final production, Render Setup is opened. Renderer must be changed to mental ray or else the effects would not be visible. Global Illumination (GI) is changed to a higher setting.

13. Trial render is tested and produced ensure lighting, composition and materials are placed correctly.
14. Final render is produced with long hours of rendering and post render is produced using Adobe Photoshop
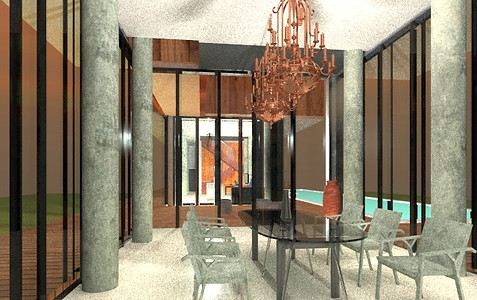
Final Interior Rendering
DRA HOUSE IN BALI BY D-ASSOCIATES-Dining Room

Final Exterior Rendering
DRA HOUSE IN BALI BY D-ASSOCIATES

bottom of page